

Written by Matt McGrady, FabLab Coordinator, High School Design Tech and Graphic Design Teacher at The American Community School in Abu Dhabi
Write it, Store it, Forget about it. Ok, maybe not exactly that, but at times it felt like documenting my curriculum was stuck in this process. Several years ago, documenting curriculum in my Atlas maps felt similar to the way I used to write long range plans in my earliest years of teaching; hours of intensive planning only to be stuck on a “shelf” somewhere.
I started to ask myself the question: who was I writing this curriculum for?
Predominantly, it felt like I was writing unit plans for the school, the curriculum coordinator, or even the next teacher. I was writing different versions of the curriculum for two separate purposes; 1) to use for me as a guide in my instruction and 2) to archive in our school’s Atlas platform. A simple change in perspective led me to some important changes in the way I currently write curriculum and use my Atlas maps. I wanted to develop curriculum content that is foremost: usable for me and my students. I made the shift to writing curriculum in Atlas for my students.
At my school, we use the backward design framework for curriculum writing. This model gives us clear outcomes that would be hit in Stage 1 learning. I wrote content and skills layers in student friendly language, so I could share it with my students as an example of the process of learning. The goal really was to write one version of curriculum that could serve the same purpose: 1) to write curriculum maps that would be used by my students to track their learning, and 2) to write curriculum content that could be shared and used in department meetings as well.
In Atlas, we use a backward design unit template. I started to think through how to create maps on paper that were structured in a way that were equally visual and clear. I needed something that kids could use, mark up, and connect to. I also needed to package this learning in a way that both students and I could check in on their individual progress. I wanted a one page document that each student could have that illustrated where they were on the learning journey, when they had met targets, and what they needed to continue working on. It was also important that the summation of their learning was connected and clearly articulated as a result of the learning they were successfully mastering.
So, I went to the drawing board. What would that document look like? Was it going to be a bar graph students filled in as they learned, stars added for achievement, or stats used to showcase learning over the course of a unit? There really is no end to the possibilities. There are many online resources that do a fantastic job of highlighting streaks of learning, levelling up, and a whole host of ways to incentivize and document learning. What was most important for me was I needed to create a document that allowed me to use the information from the Atlas categories AND support the learning in my class on a student friendly level. I played around with some drafts, and asked the question: What needed to be accomplished to complete my school’s requirements for documenting curriculum in Atlas? 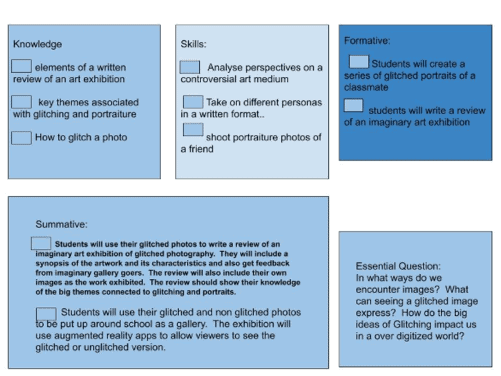
Skills and Knowledge, Essential Questions and Enduring Understandings seemed the easiest categories to tackle in Stage 1. Standards seemed too heady for the document I was considering so I initially left these off in early drafts. These top level titles became boxes that I populated in both Atlas and in my Google Drawing and I made sure to keep the language the exact same - using my students as the audience. In early iterations, I left a lot of space for students and me to document our conversations about their learning. I wanted this document to give life to learning not only document it for storage. 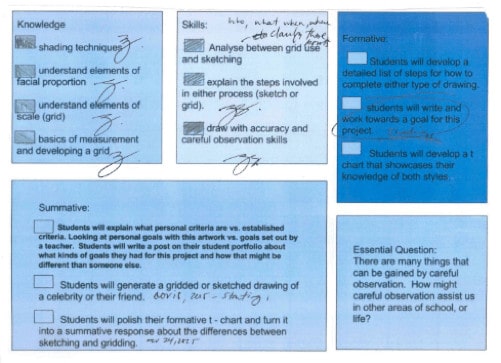 I also made sure to have the essential questions of a unit on this document so that students and I could have an honest conversation about how granular level learning could connect to bigger picture ideas in the unit. This small choice had a big impact and I started to really get a clear picture of students who were cognitively making these very cool connections. The conversations students and I were having were incredibly valuable and the feedback I was able to provide was timely, specific, and presented in a manner that spoke to the learning process.
Based on the feedback I was getting from my students and some of my colleagues, we also played around with the idea of students’ self-assessing their own learning at their own pace and adding a summative learning section to the document. If a student felt they had reached a particular level of mastery, they could show me during our conferences. This addition gave us great opportunities for students to really understand the expectations and move at their own pace. These changes provided me quality feedback regarding their current ability levels so I could adjust units in the future. In the end, this is really just a nugget of an idea, and I hope that in reading this blog you will try to create your own version of this document for your individual students or possibility for your class as a whole. Imagine walking into a classroom and seeing something like this on a wall. All of the skills and knowledge that students were gaining in that unit, explicitly up on the wall with documentation as to when it was mastered. How cool? This project all started with my frustration of the need to document curriculum within Atlas and then creating separate ways to include students in this learning. I wanted to write curriculum for them and maximize my time and effort in the process! What I am most proud of is that in flipping the idea on its head, I moved from feeling like I was working on two separate tasks to making unit planning in Atlas work for all of us.
Updates during COVID-19 and our remote learning environment:
Our school moved to a remote online learning environment the week of March 9, 2020 and as of today (May 5, 2020), we have no firm plans on when we will return face to face. We’ll have to wait and see what the future holds, but I wanted to give you an update on how we are sharing information with students in my classroom as well as on a school level. Just the right amount. My high school students have eight distinct classes. That is eight teachers vying for time, attention, and commitment from students who are at home. Some are bored, some are nervous, some are highly stressed. Finding the balance of information to share with students has been tough. Too much information and I sometimes see dedication dwindle. Too little information and my inbox fills with questions. An articulated Atlas map for learning, like the ones I have outlined previously, are powerful documents for sharing the learning path with students. It gives both teachers and students a sense of direction and progression. Due to COVID -19, worldly progression and direction still feel uncertain. When will we be back to a school building? When will we be back to “normal”? Perhaps, now is a perfect time to try the technique of sharing an Atlas map with your students, but with caution. You know your students and what they can handle; you know your parent community and what they need. Now more than ever is a time to share weekly prioritized learning, delivered in manageable chunks. Here is an example of a shared unit format I am using in my High School Graphic Design class. 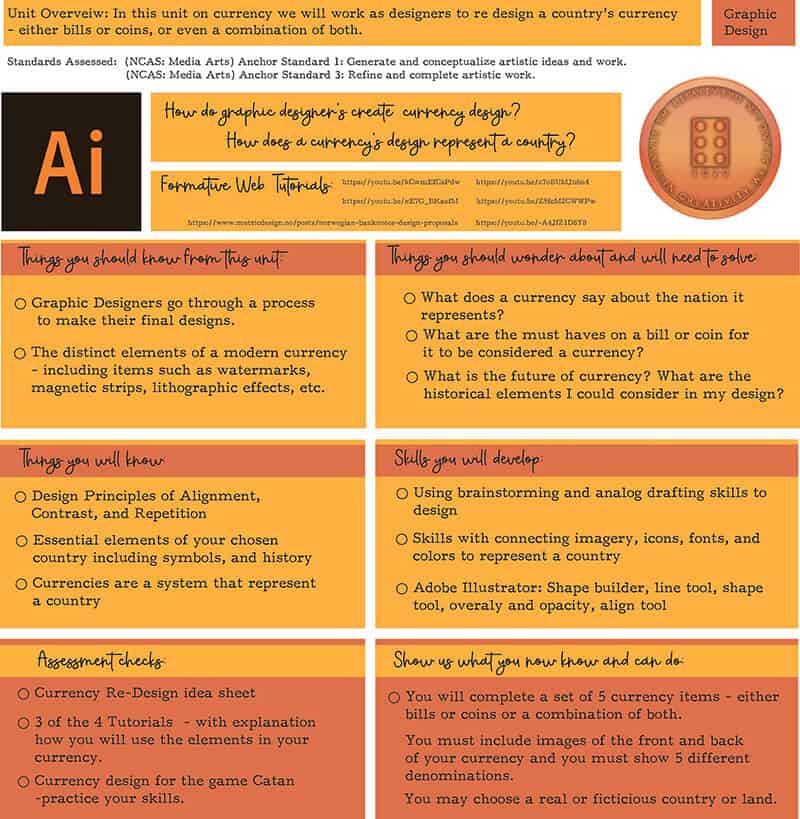 If you are meeting with students synchronously try using an Atlas Map for learning and share it with your students to show them where they are going with their home learning. Then use weekly learning outcomes to show the progression on a copy for yourself. What a great way to start a video call, “Look how far we have come in this unit? We know how to….. We can…….” In these times where positivity is a must - finding the wins in remote learning has to be celebrated! At the High School level, we have chosen to share information in a consistent format with our students and families. This consistency also demonstrates to families, students, and others how these learning experiences fit into the larger whole progression and direction of learning in these uncertain times. For example, in my High School Graphic Design class, I share my Atlas unit plan (see image above) and use the format below.
PREVIEW - WHAT WILL YOU DO THIS WEEK? During this week - we will work on architectural examples of the draw over effect, thinking about our self-portrait we are aiming to make. We will use other photographs and create a draw over effect with their image of the view from their window.
PREPARE: RESOURCES YOU NEED You will need another’s photo from the gallery folder and an image to manipulate for your self-portrait.
ENGAGE: THINGS TO BE DONE DUE by next class: Complete an architectural draw over of an image from the folder of classmates photography. Alternatively - choose a photo from your personal camera roll that you would like to add a draw over effect to a building or monument. Curate your own images needed for your self-portrait.
CONNECT: WAYS WE WILL STAY CONNECTED Graphic Design 4 9 AM - 10:45 and Graphic Design 5 - 11:45 - 1:30 PM - we have class on Tuesday
Finding the balance will be key. I wish you all the best with this journey.
View Matt's webinar!
SIGN UP OR LOGIN TO MINIPD TO BOOK A SESSION WITH THE AUTHOR!
Matt is an artist and designer who currently teaches an outstanding group of amazingly brilliant students. He has been leading art and design classes with middle and high school students for 14 years and has lots of fun planning and designing content for his courses. Matt also works at local art galleries and museums leading sessions on Art and Maker activities. Matt is originally from Canada but has called Abu Dhabi home for the last 11 years.